はじめに
こんにちは! テクノロジー戦略本部 開発二部の金子です。
自分が担当するプロジェクトでは、Apollo Client を利用した GraphQL の実装を行なっています。
APIの繋ぎ込みを行う際、多重サブミットの防止をBEのみならずFEでも保険的に行いたいということがありました。
そこで、間引き処理を一律で行う Apollo Link を作成したので紹介します。
対象読者
以下のような課題を抱えている開発者の参考になれば幸いです。
- 多重サブミットの間引き処理を一律で設定したい
- 多重サブミットが行われた際にエラーを表示させるのではなく、フロントエンドで多重サブミットを防ぐことでUXを向上させたい
- バックエンドで多重サブミットを防ぐのは工数がかかるため、フロントエンドで保険的対応したい
従来手法
Apollo Link で間引き処理を入れる方法として、apollo-link-debounce を利用する方法があります。
apollo-link-debounce は、その名の通りリクエストをデバウンスする Apollo Link です。
以下のように、リクエストごとにキーを設定し、同一のキーに対するリクエストには間引き処理を適用します。
import { gql, ApolloLink, HttpLink } from '@apollo/client';
import { RetryLink } from '@apollo/client/link/retry';

import DebounceLink from 'apollo-link-debounce';

const DEFAULT_DEBOUNCE_TIMEOUT = 100;
this.link = ApolloLink.from([
    new DebounceLink(DEFAULT_DEBOUNCE_TIMEOUT),
    new HttpLink({ uri: URI_TO_YOUR_GRAPHQL_SERVER }),
]);

const op = {
    query: gql`mutation slide($val: Float){ moveSlider(value: $val) }`,
    variables: { val: 99 }
    context: {
        // Requests get debounced together if they share the same debounceKey.
        // Requests without a debounce key are passed to the next link unchanged.
        debounceKey: '1',
    },
};

const op2 = {
    query: gql`mutation slide($val: Float){ moveSlider(value: $val) }`,
    variables: { val: 100 },
    context: {
        // Requests get debounced together if they share the same debounceKey.
        // Requests without a debounce key are passed to the next link unchanged.
        debounceKey: '1',
    },
};

// Different debounceKeys can have different debounceTimeouts
const op3 = {
    query: gql`query autoComplete($val: String) { autoComplete(value: $val) { value } }`,
    variables: { val: 'apollo-link-de' }, // Server returns "apollo-link-debounce"
    context: {
        // DEFAULT_DEBOUNCE_TIMEOUT is overridden by setting debounceTimeout
        debounceKey: '2',
        debounceTimeout: 10,
    },
};


// No debounce key, so this request does not get debounced
const op4 = {
    query: gql`{ hello }`, // Server returns "World!"
};

link.execute(op).subscribe({
    next(response) { console.log('A', response.data.moveSlider); },
    complete() { console.log('A complete!'); },
});
link.execute(op2).subscribe({
    next(response) { console.log('B', response.data.moveSlider); },
    complete() { console.log('B complete!'); },
});
link.execute(op3).subscribe({
    next(response) { console.log('C', response.data.autoComplete.value); },
    complete() { console.log('C complete!'); },
});
link.execute(op4).subscribe({
    next(response) { console.log('Hello', response.data.hello); },
    complete() { console.log('Hello complete!'); },
});

// Assuming the server responds with the value that was set, this will print
// -- no delay --
// Hello World!
// Hello complete!
// -- 10 ms delay --
// C apollo-link-debounce
// C complete!
// -- 100 ms delay --
// A 100 (after 100ms)
// A complete!
// B 100
// B complete!
従来手法の課題
多重サブミットの保険的対応として apollo-link-debounce を用いる際の課題として、以下の3点が挙げられます。
- キーをリクエスト毎に設定しなければならない
- キーを適切に発行しなければならない
- 遅延が一律でかかってしまう
1. キーをリクエスト毎に設定しなければならない
全ての mutation で一律で間引き処理を設定したい場合でも、mutation ごとに context オプションでキーを設定しなければならないため、開発が進んでからは導入しにくいという課題があります。
2. キーを適切に発行しなければならない
context にキーを重複なく正しく設定することが必要になるという課題があります。
キーを誤って設定してしまうと、意図せず間引き処理が適用されてしまう可能性があります。
3. 遅延が一律でかかってしまう
スライダーがユーザーによって動かされた後に静止する値など、最終状態が重要な場合には有用ですが、多重サブミットのように最初のリクエストが重要な場合は用途として適切でないです。
例えば、1sの遅延を設定した場合、ダブルサブミットしない場合に対しても一律で1s待ったのちにリクエストが処理されてしまいます。
提案手法
従来手法の課題で挙げた3点を解消するような Apollo Link を作成します。
キーの設定については、operationName と variables によりキーを自動生成することで、リクエストごとにキーを設定する必要がないようにします。
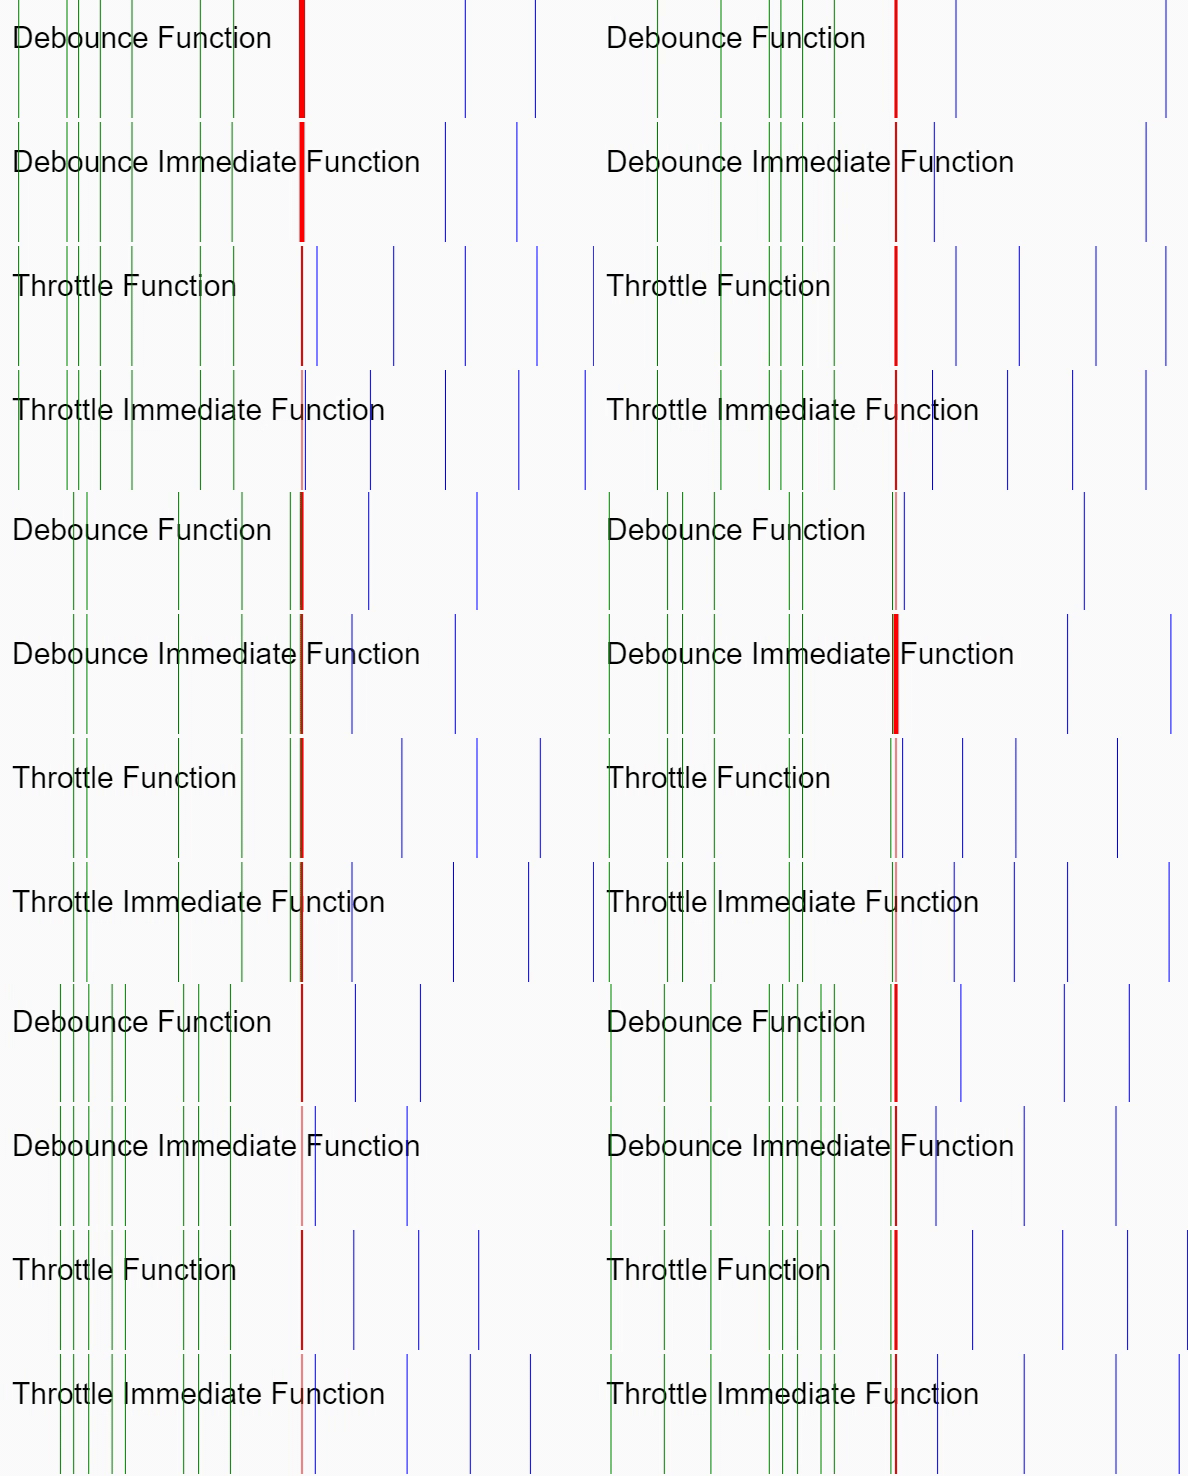
間引き処理については、最初のリクエストから一定時間の間に同一リクエストが行われたとき、最初のリクエストのみを有効にします(以下の GIF における Debounce Immediate Function に相当します)。

実装の説明
具体的な実装について説明します。 作成したコード全体は以下の通りです。
import { ApolloLink, Observable } from "@apollo/client";
import type { NextLink, Operation, FetchResult } from "@apollo/client";

type RequestKey = readonly unknown[];

type StartTimeMap = {
  [hash: string]: number;
};

export class DebounceLink extends ApolloLink {
  private map: StartTimeMap = {};

  constructor(private readonly delay: number) {
    super();
  }

  request(operation: Operation, forward: NextLink): Observable<FetchResult> {
    const { operationName, variables } = operation;
    const key = [operationName, variables];
    const hash = this.hashRequestKey(key);

    const hasMutation = operation.query.definitions.some(
      (d) => d.kind === "OperationDefinition" && d.operation === "mutation"
    );

    if (!hasMutation) return forward(operation);

    return new Observable<FetchResult>((observer) => {
      const now = Date.now();
      const start = this.map[hash] ?? -Infinity;

      if (now - start > this.delay) {
        this.map[hash] = now;

        return forward(operation).subscribe(observer);
      }
    });
  }

  // Copied from: https://github.com/TanStack/query/blob/8c967c73d66200790e8a4aeb153ac629d3e4be4c/packages/query-core/src/utils.ts#L269
  private hashRequestKey(requestKey: RequestKey): string {
    return JSON.stringify(requestKey, (_, val) =>
      this.isPlainObject(val)
        ? Object.keys(val)
            .sort()
            .reduce((result, key) => {
              result[key] = val[key];
              return result;
            }, {} as any)
        : val
    );
  }

  // Copied from: https://github.com/jonschlinkert/is-plain-object
  private isPlainObject(o: any): o is Object {
    if (!this.hasObjectPrototype(o)) {
      return false;
    }

    // If has modified constructor
    const ctor = o.constructor;
    if (typeof ctor === "undefined") {
      return true;
    }

    // If has modified prototype
    const prot = ctor.prototype;
    if (!this.hasObjectPrototype(prot)) {
      return false;
    }

    // If constructor does not have an Object-specific method
    if (!prot.hasOwnProperty("isPrototypeOf")) {
      return false;
    }

    // Most likely a plain Object
    return true;
  }

  private hasObjectPrototype(o: any): boolean {
    return Object.prototype.toString.call(o) === "[object Object]";
  }
}
まず、キーの生成について説明します。 キーの生成は、TanStack/query の実装を参考にしました。
// Copied from: https://github.com/TanStack/query/blob/8c967c73d66200790e8a4aeb153ac629d3e4be4c/packages/query-core/src/utils.ts#L269
private hashRequestKey(requestKey: RequestKey): string {
    return JSON.stringify(requestKey, (_, val) =>
        this.isPlainObject(val)
        ? Object.keys(val)
            .sort()
            .reduce((result, key) => {
                result[key] = val[key];
                return result;
            }, {} as any)
        : val
    );
}
本手法では、 requestKey には operationName と variables が同じ場合、同一リクエストと定義します。
例として、ユーザー取得をする場合のキーの生成を示します。 オペレーション名と変数のタプルを引数に渡すことでキーを生成しています。
const operationName = "CreateUser"
const variables = { name: "foo", email: "foo@example.com" }
const requestKey = [operationName, variables]

hashRequestKey(requestKey)
// ["CreateUser",{"email":"foo@example.com","name":"foo"}]
次に、間引き処理について説明します。 以下のように、最初のリクエストから一定時間の間に同一リクエストが行われたとき、最初のリクエストのみ有効にしています。
const now = Date.now();
const start = this.map[hash] ?? -Infinity;

if (now - start > this.delay) {
    // 最初のリクエストから一定時間が経過した場合
    this.map[hash] = now;

    return forward(operation).subscribe(observer);
}
以上より、多重サブミット防止に最適化した Apollo Link を実現しています。
使用方法の説明
作成した Apollo Link の利用方法について説明します。
以下のように、HTTPLink の手前に DebounceLink を設定するだけで利用できます。
import { gql, ApolloLink, HttpLink } from '@apollo/client';

const DEBOUNCE_TIMEOUT = 100;

this.link = ApolloLink.from([
    new DebounceLink(DEBOUNCE_TIMEOUT),
    new HttpLink({ uri: URI_TO_YOUR_GRAPHQL_SERVER }),
]);
比較
従来手法と提案手法の比較は以下の通りです。 提案手法では、多重サブミットに最適化した Apollo Link を作成できました。
| 従来手法 | 提案手法 | |
|---|---|---|
| キーの設定の有無 | 必要 | 不要 |
| 間引きの方法 | 最後のリクエストを有効にする | 最初のリクエストを有効にする |
まとめ
多重サブミットの保険的対策として、Apollo Link による間引きを実現しました。
今回作成した Apollo Link が、同様の悩みを抱えている方の助けになればと思っております。
BuySell Technologiesではエンジニアを募集しています。こういった取組みに興味がある方はぜひご応募をお願いします!
